
Understanding the React Context API with a reference project

If you are still using the prop drilling process to manage the created state in your project, then you need to update the way you are managing these states and adopt the Context API of React in its place. Let's learn what React Context API is along with its use in a React Native project.
Define React Context
If you have worked on a React project, you may have seen that data is passed on in a top-down format. In this process, you have to use props. On this note, the Context in React eliminates the necessity of props in passing states; thereby pacing up the process.
You can send data across the component chain from the parent component to the child component with React Context. You don't have to take the hassle of manually passing props.
The category of data that are commonly passed with React context is user-based data, location-based data, and theme-based data.
As we head forward in the blog, we need to get familiar with the Context API.
Define React Context API
A tool, Context API has made the life of developers much easier. If you are a React developer, you should know the importance of the Context API in state management.
It helps to build global variables that can be easily shared across the project (React).
However, to use this in your project, you have to import a particular component and that is createContext. After importing it, introduce the createContext components as a function. It takes the Producer and the Consumer into action.
If you are confused about the concept of the Producer and the Consumer, both are the components that are used in Context API. the former component, i.e., the Producer passes on the data or context. However, the Consumer consumes the context or the data of the created state. Hence, you can see that you don't have to rely on the much more complicated process of Prop drilling.
When is it effective to use the Context API?
It is always effective to choose the context API tool over the prop drilling process while you are in state management tasks. However, project development gets much easier with the context API when 20 to 25 components are nested in the project. In that case, considering prop drilling procedures to share the updated data of the state variable can be quite challenging.
For smart work, the Context API is always recommended.
Now that we somewhat are familiar with the purpose of using the Context API, let's see how we can incorporate the tool into a React project.
An ‘App login’ project using Context API
In this project, we will create an app interface where users can provide their app login credentials. Here, we will use the createContext component and the React Context API.
What are the prerequisites for the project?
There are three tasks that you need to complete before moving forward with the codebase.
These are as follows.
1. Environment setup
This setup is about installing software that you would need to build any React Native project. The software includes Node.js, Android Studio, and others. Also, not if you are considering React Native CLI instead of Expo CLI, the setup procedure is different. So, check the attached article and get all the process in detail.
2. A Project template
This is about creating a template that you can store in your codebase for the current project. In simple words, you have to build a basic folder using React Native.
If you want me to guide you through the steps of creating this template, then here it is.
- Build a new folder in the C drive.
- Open the command prompt from this folder and pass a command:
npx react-native init LogIn --version 0.68.1.Your template with the name ‘LogIn’ will be created.
3. Getting a library (Axios) for the project
Here, you have to install the Axios library using the npm command. It is a promise-oriented HTTP client used for making XML HTTP and HTTP Requests.
In our project, we will use the POST request in our codebase.
The installation command for this library is as follows.
npm install axios.
Framing the App.js file
Open your project template from your code editor and you will find a .js file named App.js file. Delete all the code syntax present in the file and start coding as shown in the following code snippet.

Image 1
In React Native, you have to start the codebase by importing RN components. You need to import Text, View, TouchableOpacity, TextInput, and StyleSheet from react-native library.
Get the component createContext, React and hook useState from the react library.
The entire React library is needed for any React application.
The createContext component from the React library will allow you to build a context object that you can use throughout your application.
You have to import Axios, an HTTP client from the third-party plugin. It will allow you to make requests to APIs and handle responses.
Note that you have to build the About component before importing this component in this App.js file.
With the export statement, the code creates a context API, it uses the createContext() method.
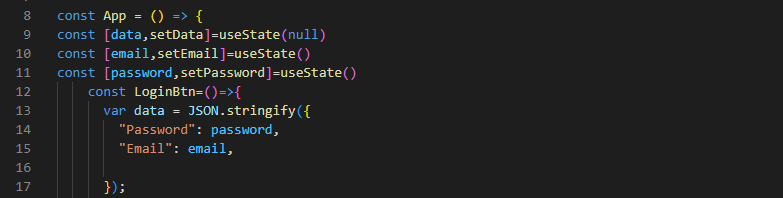
Image 2
App is the React component. The code defines this component. useState is used to set the state of three variables. These variables are password, email, and data. The initial value of the data is specified as null and that of password and email are undefined.
LoginBtn is a function used in the code. It will enable the login functions when the user taps the login button on the app screen.
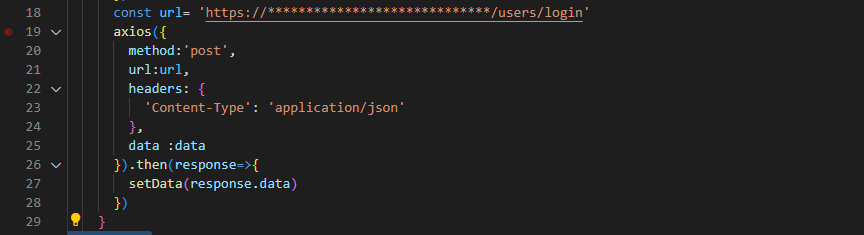
Image 3
The code syntax shown in image 3 is about creating a POST request. This request is directed to the provided URL. This is done using the Axios library.
The code works in a way that in case the status of the request is successful, the data received as response data is considered variable data.

Image 4
The ContextApi is considered to build the login or logout functionality. It decides whether the user has provided a password and email id to log in to their account.in case, the value of the data variable is still null. The app will render the login button. However, if the user has logged into their account, the app screen will render a ‘LogOut text’ on it.
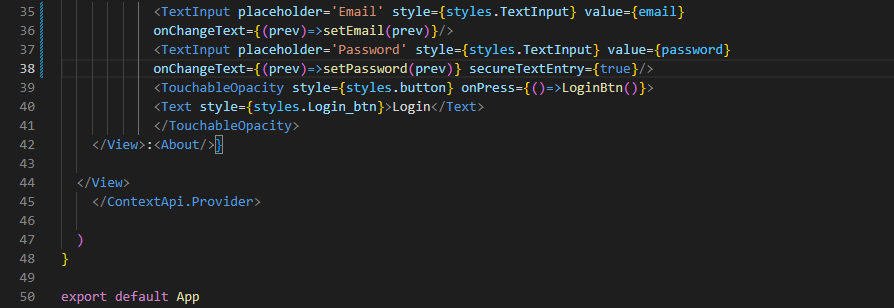
Image 5
Here, the code designs a login page. As the user provides their login credentials, the backend server will send the information to the web server. On checking the accuracy of the login credentials, it will provide response-based data. setData() is considered to update the value of the data variable.
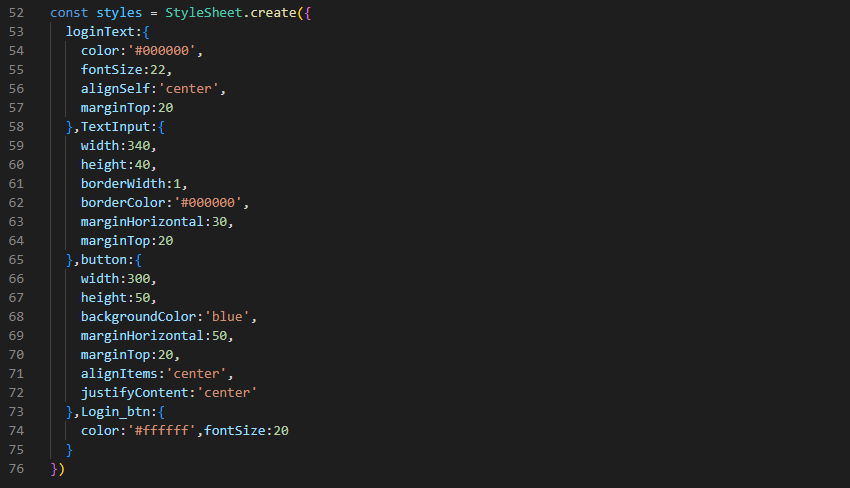
Image 6
This syntax is based on the CSS style format. Here, it builds the style sheet objects and designs the overall app.
Framing the About.js file
In this segment, you need to build a .js file named About.js in your project template. You can do this in your code editor as well.
After creating this file, frame the codebase as shown in the following snippets.

Image 7
First, you need to get the core components from the React Native framework. The components are the Button, Text, View, TouchableOpacity, and StyleSheet.
useContext is used to build the context object.
Lastly, you need to import the ContextApi from the App.js file. It will allow you to get the data from the App.js file.

Image 8
The About component is introduced at the beginning. It is considered as the const variable. It relies on the ContextApi for the response.
It has the logout() function. When the user taps the logout button, the response data will be set to null.
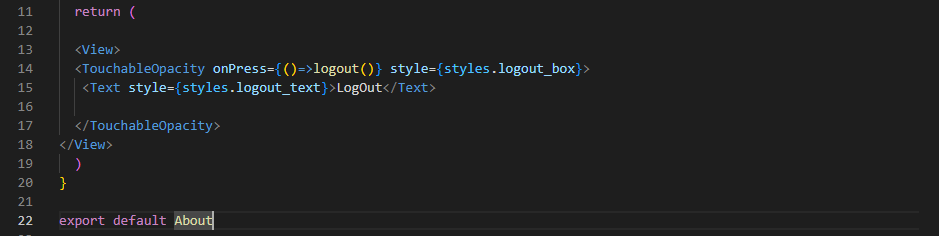
Image 9
In this syntax, View, Text, and TouchableOpacity components are returned. The styling element is used for the logout_box and logout_text.
The app screen will render the text ‘LogOut’ when the user logs out from their account.
Lastly, you have to export the About component at the end of the codebase before starting with the styling objects.
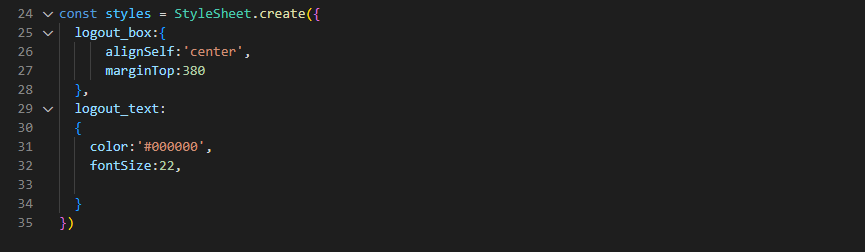
Image 10
The styling parameters mentioned in image 10 are for designing the objects such as logout_box and logout_text.
After completing the codebase, you have to run the program.
Steps to run the codebase on a device
- Run the command prompt from your project template where you have embedded the codebase.
- Two commands have to be run simultaneously one after the other in the command prompt.
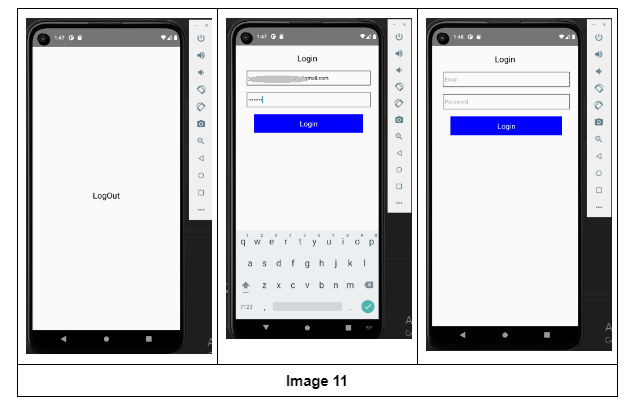
- The two commands are npm install and npx react-native run-android. And you are done. Your program will run on the emulator or virtual device, as you say. Get a reference of the output for my Context API-based React Native project from image 11.

A science graduate who has a keen interest to lean about new technologies and research area. With an experience in the field of data analytics and content writing, she aims to share her knowledge among passionate tech readers.


