
Say Hello to React Native's Native Stack Navigator

Navigating between different screens becomes easier with the createNativeStackNavigator component of React Native. In this blog, we will learn how to create different screens and stack one screen on top of the other. Also, you have to install different plugins for the project. Let’s understand the entire process in detail.
What is the use of Stack Navigator functionality in your app?
Stack Navigator functionality is a part of frontend development considering which you can increase the UX of your app. It provides easy navigation to other screens and at the same time renders a native feel to the app’s view element. You can add this feature to Android and iOS devices. Also, you can add the same to Web pages. However, for the web page, you need to use react-native-web.
While you are embedding this functionality into a mobile app, it gives a similar kind of look to both iOS and Android. So, it is better to customize as per project requirements. This will add an element of uniqueness to the UI.
I want to emphasize a point that while adding the functionality, you can either go for @react-navigation/native-stack or @react-navigation/stack. However, there are certain conditions applied that can validate the appropriate fit of these two dependencies. If you want to attain more flexibility, you should choose @react-navigation/stack. On the other hand, if you are looking for native performance, you need to use @react-navigation/native-stack.
For our project, we will be using @react-navigation/native-stack.
What are the prior-need tasks?
- The setup of React Native Environment- Here, you have to download software like Node.js and Android studio. To create and edit the code, you have to get an IDE (Integrated Development Environment). In this current project, I have used the Visual Code Editor. The most recommended IDE for React Native is the VS Code editor, as recommended by the developers of React Native app development company. This is the first step to start considering app development with React Native. If you have already built a project using this framework, you can skip this step and start building the template. Visit the blog article to learn the Environment setup process.
- Building a React Native template- This is a segment of project initialization where you need to create the React Native template. This will be a basic template where you have to embed the codebase. For creating the template, open the cmd from any folder of the local C drive. Then pass the command npx react-native init StackNavigator --version 0.68.1. This way, your template will be built with the name StackNavigator.
- Third-party plugin configuration- This is the most important part as getting the third-party plugin can make your development process much easier. You don't have to code from scratch. You can take advantage of the code reusability of React Native framework and make your development faster.
Consider installing the following plugins.
- @react-native-masked-view/masked-view
- @react-native-safe-area-context
- @react-navigation/native
- @react-navigation/native-stack
- @react-native-screens
For installing specific plugins, you have to run individual commands in your app terminal. The commands are as follows.
- npm i @react-native-masked-view/masked-view
- npm i react-native-safe-area-context
- npm i react-native-navigation
- npm install @react-navigation/native-stack
- npm i react-native-screens
After you are done with all these steps, get into the codebase.
Getting started with the codebase and .js files
We need to build a codebase for four files. These are Home.js, About.js, Create.js, and App.js.
For the Home screen
Go to your code editor and open the template file that you have built. Create a Home.js file and follow the code snippets shown below.
1
2
import {stylesheet, Text, View, Image, Touchableopacity} from 'react native'
import React from 'react'
Import the components from the native library. Here, it is the react-native library.
The components are as follows.
- StyleSheet
- View
- TouchableOpacity
- Image
- Text
Also, you need to import the entire React component from the react library.
1
2
3
const Home = ({navigation}) => {
  cons NavigationPage=() => {
     navigation.navigate('About')
The Home component is built in this code syntax. It has a button on it. When the user taps the button, it will direct them to the About screen. The Navigation prop is used to enable the navigate function.
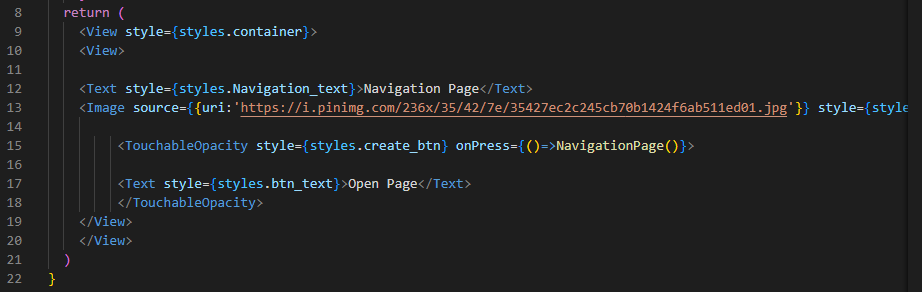
Image 3
Return() function is used to hold the Text, Image, and View components. The View component holds the main container. The Text component holds a text element ‘Navigation Page’. The Image component has a unique source which will be called and rendered on the screen when the user navigates to the Navigation page.
export default Home
Exporting the Home component is required so that you can use it in the App.js file.
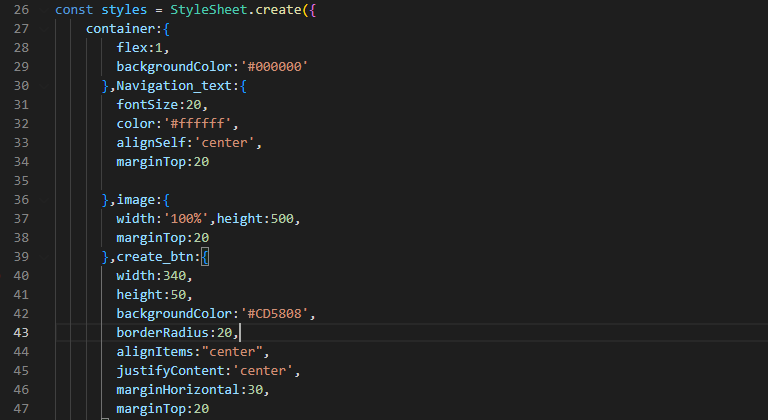
Image 5
The snippets shown in image 5 are about the styling objects and parameters used to style the considered objects. You can either follow this or you can add some other parameters to it.
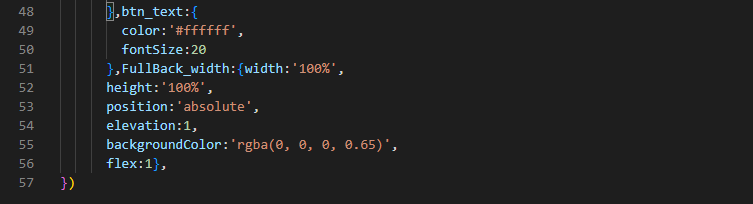
Image 6
For btn_text, I have used a specific color and 20 pixels as its font size.
For FullBack_width, the Dimension method is used to ensure that the app interface is responsive to any screens and orientation.
For About screen
Create a file named ‘About.js’ in your project directory and start building the codebase.
1
2
import { stylesheet, Text, View, Image, Touchableopacity } from 'react native'
import React from 'react'
Here, we have used only the native components to get space for View, Image, Button, and Text elements.
You may or may not import React from the react library. This is a way of getting all the React components.
1
2
3
4
const About = ({navigation}) => {
  cons NavigationPage = () => {
   navigation.goBack()
   }
A new component About is introduced, in which the code holds the NavigationPage function. This function is for navigating to the Back page. A Button will be built later in the codebase and linked to this function. This will be for returning to the previous page.
1
2
3
const NextPage= () => {
  navigation.navigate('contact')
  }
It specifies the NextPage function. When called, it will take the user to the Contact page. It helps in navigating between the Home and Contact screens.
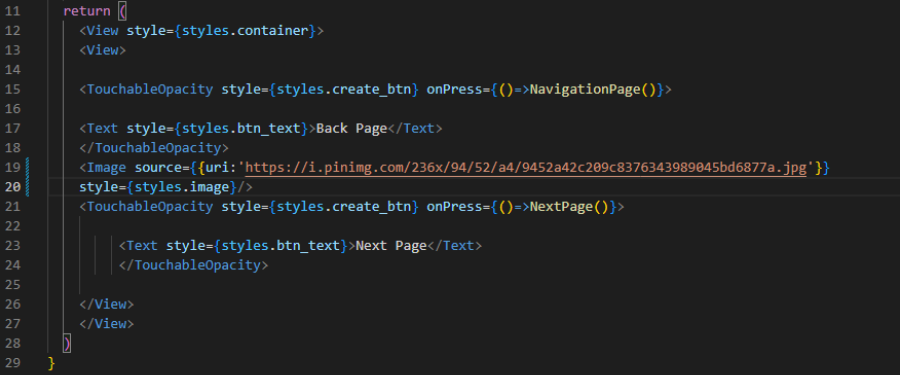
Image 10
The code returns two Buttons, a Text element, a View (Container), and an Image from the source specified in the code snippet of image 10. Styles object is considered to design each of these elements and the two buttons. NavigationPage() is used for navigating to the previous page and NextPage() is used to direct to the Next Page.
export default About
Also, we have to export the entire code of the About.js file so that we can use it in the App.js file.
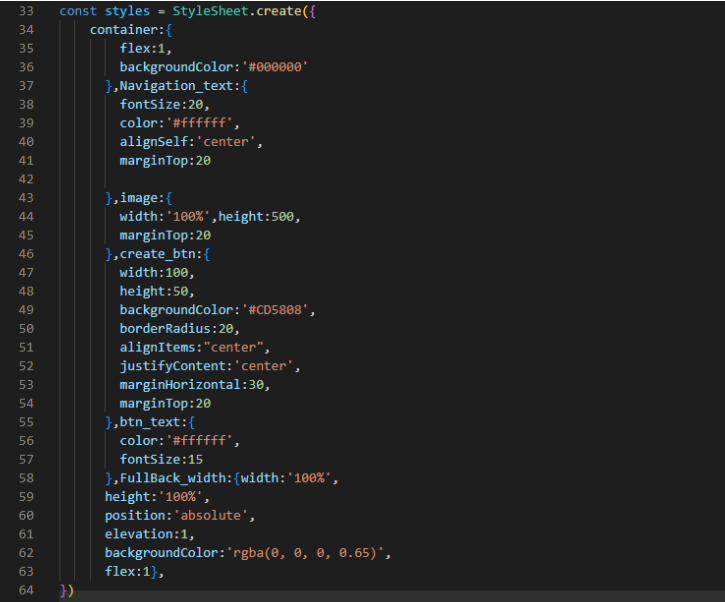
Image 12
Similar to the Home.js file, you have to consider styling objects for the About.js file as well. Refer to the otter shown in image 12.
For Contact screen
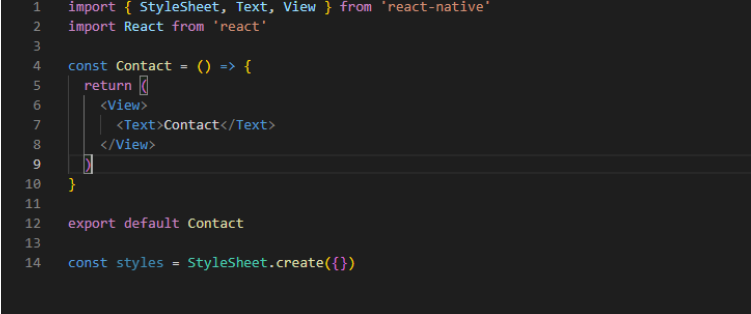
Image 13
For the Contact screen, you have to import all the relevant components and create a Contact component.
This is a simple codebase for which you need View, Text, and StyleSheet components.
The code returns a View and a Text component. The screen will only render the text ‘Contact’ on the screen.
App.js file
This is the most important file for the project. You have to embed all three screens you have created so far. Let's see how we can complete the task.

Image 14
As you can see, we have imported contact, about and Home component from three different files stored in this project directory.
Also, NavigationContainer and createNativeStackNavigator components are to be imported from @react-navigation/native and @react-navigation/native-stack respectively. These are the plugins that you installed at the start of this project.
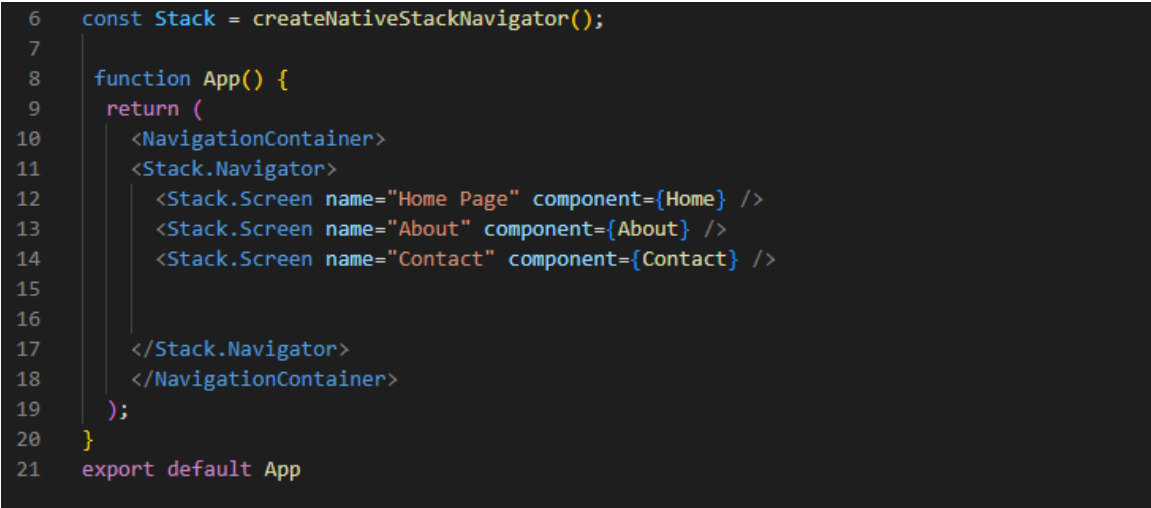
Image 15
This code (in image 15) builds a navigation container. This container considers a native stack navigator. It is a navigation type that lets users flip between created screens. Here, you have to set up three different screens: Contact, About, and Home Page. Also, link an independent component for each screen.
Lastly, export the Component App.
How to execute the codebase on the Virtual device?
Follow the below-given steps to run your program on the emulator or a virtual device.
- Open the command prompt.
- Type cd StackNavigator. This StackNavigator is the template where I have added all the codebase. However, if you have created the template with a different name, you have to pass cd (the name of the template that you have created for the Stack Navigator project).
- Then pass npm install
- Now, npx react-native run-android on the same command prompt.
- This way, your app will start on the emulator.
Consider images 16, 17, and 18 as my project output on the emulator.
Image 16 is for the Home Page screen, image 17 is for the About screen and image 18 is for the Contact screen.
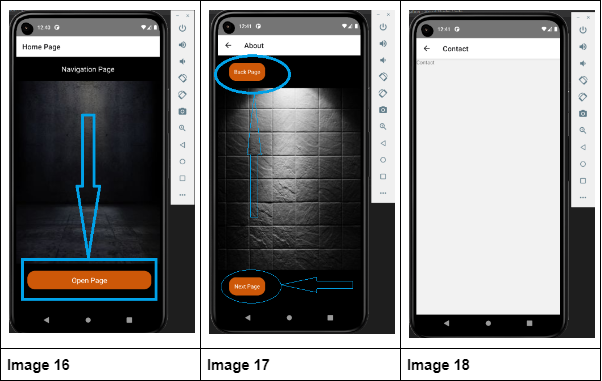
You can customize this interface by adding a different Image and text element. However, the foundation and process to execute this project will remain the same.

A science graduate who has a keen interest to lean about new technologies and research area. With an experience in the field of data analytics and content writing, she aims to share her knowledge among passionate tech readers.


