
How to create a UPI app interface using React Native?

Given the increasing number of digital transactions across the world, the demand for UPI apps is on the rise. As a developer, you may be thinking of creating such a UPI app with which your user can make hassle-free payments. In this blog, my main aim is to explain each step of building a robust UPI app. You will also find a detailed explanation of the codebase.
Before getting into the codebase and its explanation, let's get an overview of the pre-requisites context, third-party packages, and React Native components used for the current project.
What are the prerequisite learnings?
There are two prerequisite learning that you need to get your hands on. The first thing is to learn how to make your development system compatible with the React Native environment. Here, all you need to do is to install certain software like Node.js, Visual Studio Code editor, and Android Studio. It is important because, without the software, you neither can create your codebase nor can run the app. So, if you are not familiar with the setup process of React Native environment, you can learn the same from the attached blog.
The other one is to learn how to build a basic React Native app. This is what a developer of React Native app development company starts with. Learning this, you will be able to navigate through the code editor and learn the process to import required React Native components from different libraries. Visit the linked tutorial blog to learn the steps of building a React Native app.
What are the third-party React Native libraries used?
The third-party React Native library has emerged to be a beneficial feature for the cross-platform app development process. You don't need to integrate unnecessary resources into your app. This way, you can reduce the app size as you can only get the resources needed for specific project requirements.
- React-native-upi-pay - It is a third-party plugin. You can install the library to get the UPI interface. With this plugin, you can also activate the option of peer-to-peer payments in your apps. Also not, you cannot use any components of this library in your codebase until you import the required components.
- React-native-elements - React-native-elements can provide you with all the ready-to-use UI kit necessary for building a React Native app. You don't need to take the struggle of organizing different packages of UI toolkits. You can simply import relevant components from the library react-native-elements and render a real look to your app screen. Here, I have imported Header and Button from react-native-elements. It is vital to note that I built the current project using React Native CLI tool. So while considering the command line for its installation, go for the npm statement and React Native CLI.
Let’s get started with the explanation of code snippets
First, you have to get all the components. For this, you have to use the import statement. Refer to the following syntax.
1
2
3
4
5
import React, {useState} from 'react';
import {View, StyleSheet} from 'react-native';
import {Header, Button} from 'react-native-elements';
import {TextInput} from 'react-native-paper';
import RNUpiPayment from 'react-native-upi-pay';
Besides the core components and hooks like useState, View, and StyleSheet, you also have to import Button and Header from react-native-elemnets; RNUpiPayment from react-nartive-upi-pay and TextInput from react-native-paper.
Going forward, you need to specify an App function and use the useState hook to track the chosen variables’ state. The variables you have to use for this UPI app are vpa, amount, transcationRef, transcationNote, and payeeName. On the other hand, setVpa, setAmount, setTransactionRef, setTranscationNote and setPayeeName are used to update any change in the value of these considered variables. These can be referred to as state objects. Consider the below-given syntax.
1
2
3
4
5
6
const App = () => {
  const [vpa, setVpa] = useState('');
  const [payeeName, setPayeeName] = useState('');
  const [amount, setAmount] = useState(1);
  const [transactionRef, setTransactionRef] = useState('');
  const [transactionNote, setTransactionNote] = useState('');
Now, to print the value of all five variables, you have to use the console.log() function.
1
2
3
4
5
 console.log('vpa>>>>>>>', vpa);
  console.log('payeeName>>>>>>>', payeeName);
  console.log('amount>>>>>>>>', amount);
  console.log('transactionRef>>>>>>>>>>>>>>>', transactionRef);
  console.log('transactionNote>>>>>>>>>>', transactionNote);
Such as the line console.log('vpa>>>>>>>', vpa); will print or log the value of vpa to the console. This is the same for all four remaining variables.
To use the component RNUpiPaymnet, you have to start with the function payMoney and move forward using the initializePayment. initializePayment is a method and a crucial element of the RNUpiPayment plugin. You have to hold two parameters: a callback function and an object under the method initializePaymentt. As you will see from the below-given code snippets, I have added important information in the first parameter. This information or data are trascationNote, transcationRef, vpa, amount, and payeeName.
Refer to the below-given syntax.
1
2
3
4
5
6
7
8
9
10
  const payMoney = () => {
    RNUpiPayment.initializePayment(
      {
        vpa, // or can be john@ybl or mobileNo@upi
        payeeName,
        amount,
        transactionRef,
        transactionNote,
      },
      () => {
You can print a message on the console regarding the status of the payment. For this, you have to use the console.log() function. You can either print success or error. Here is how you can do this.
1
2
3
4
5
6
7
  console.log('success>>>>>>>>>>>');
      },
      err => {
        console.log('err>>>>>>>', err);
      },
    );
  };
For the Heading and the components added to it, you have to introduce the <View> component. Also, you have to integrate styling parameters into it.
Consider the following syntax.
1
2
3
4
5
6
7
8
9
10
11
 return (
    <View>
      <Header
        style={styles.header}
        leftComponent={{icon: 'menu', color: '#fff'}}
        centerComponent={{
          text: 'NC PAY',
          style: {color: '#fff', marginTop: 5},
        }}
        rightComponent={{icon: 'home', color: '#fff'}}
      />
There is a centerComponent, rightComponent, and leftComponent. Each of the components has a specific color code along with an icon and text element. A menu icon is added for leftComponent, a home icon is added for the rightComponent and a text element is added for the centerComponent.
For the main container, you have to write the below-given syntax.
1
2
3
4
5
6
7
8
9
10
11
12
13
14
15
16
17
18
19
20
21
22
23
24
25
26
27
28
29
<View style={styles.container}>
        <TextInput
          mode="outlined"
          label="VPA ID"
          onChangeText={value => setVpa(value)}
        />

        <TextInput
          mode="outlined"
          label="Payee Name"
          onChangeText={value => setPayeeName(value)}
        />
        <TextInput
          mode="outlined"
          label="Amount"
          onChangeText={value => setAmount(value)}
        />
        <TextInput
          mode="outlined"
          label="Transaction Reference"
          onChangeText={value => setTransactionRef(value)}
        />

        <TextInput
          mode="outlined"
          label="Transaction Note"
          onChangeText={value => setTransactionNote(value)}
        />
      </View>
With this syntax, you can add five labels: Transaction Note, Transaction reference, Amount, Payee Name, and VPA ID in your app screen. For this, you have to wrap the TextInput component with the View component. You also have to use a prop: onChangeText to call the state object for each chosen variable. As the user inputs their credentials, the code will update the initial value with the user’s information.
As the user provides their information related to the payment that they want to make, they also have to click on a button to finalise their payment. Here, you need to add a button. For this, add the below-provided syntax.
1
2
3
4
5
6
<View style={styles.btnStlye}>
        <Button title="Pay Now" onPress={payMoney} />
      </View>
    </View>
  );
};
It has a Button and the user will see the title “Pay Now” on it. onPress prop is used to call the payMoney function.
Now, your codebase has been framed. Moreover, you can also use the styling elements to it by using the styleSheet component. Below-given is the way you can achieve it.
1
2
3
4
5
6
7
8
9
10
11
12
13
14
15
16
const styles = StyleSheet.create({
  header: {
    marginTop: 30,
  },
  container: {
    justifyContent: 'center',
    marginTop: 130,
    marginLeft: 20,
    marginRight: 20,
  },
  btnStlye: {
    marginTop: 20,
    marginLeft: 20,
    marginRight: 20,
  },
});
As you can find, the header, container, and the btnStyle is designed with specific parameters.
Don't forget to export the main function App. Use the line export default App; at the end of your codebase.
Running the app on the emulator
To test the app, you either have to run the app on an emulator or you can do it on your real android device. Here, I will show you how you run the app on the emulator or virtual device.
First, enable a new project terminal. You can open one from your Visual Studio code editor and pass the command npm install. With this command, you will get all the required packages. After this action, you have to run npx react-native run-android. This will activate the emulator. However, it may take some time to bundle.
As soon as the emulator starts, you will see the app running on the emulator. Refer to the below image.
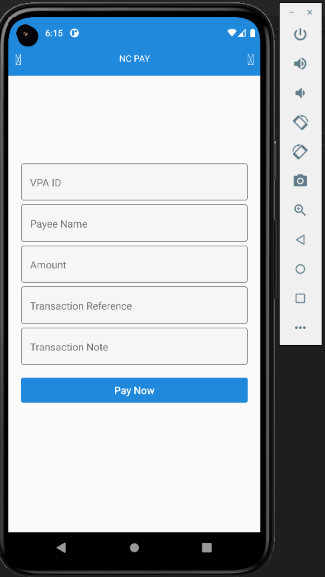
Here, as you can notice, all five labels are displayed on the main app screen with the button “Pay Now”. You can add your credentials and get the payment done.
This is just a UPI app interface that we have learned in this tutorial blog. There are a lot of backend operations that need to be done to make the payment successful. So, learn the UPI app-making process from this blog before learning the other backend operations associated with the UPI payment.

A science graduate who has a keen interest to lean about new technologies and research area. With an experience in the field of data analytics and content writing, she aims to share her knowledge among passionate tech readers.


