
How to add google Maps features to the React Native app?
Google map is an important feature when it comes to locating a particular place where you want to go. Now, you don't have to rely on any unknown person to get the roadway to your destination. React Native app development company has been using the framework React Native to add different features. In this blog, we will learn the steps of adding Google Map features to your react Native app.
However, in the initial phase, you have to be friendly with the prerequisites criteria.
Pre- requisites criteria
- You have to learn about the API calling steps. This way, you can fetch the data about the considered location and get the right direction to reach the specified region. You can visit the blog on ‘How to make a GET request to an API from a React Native app’ and clear your concept.
- Install all the software required to run the React native environment in your system. Here, I cannot discuss the entire process but you can definitely check the article and start your self-learning journey on setting up the React Native environment in your system.
- Lastly, you should have a fair knowledge of the components of React Native and how it is used for different project criteria.
Consideration of third-party react Native plugin support
React Native CLI tools come with a wide range of options, with which you can simplify the codebase and make the app process much easier. One such feature of React Native framework includes third-party plugin support. You don't have to burden the app with unnecessary packages. You can simply add the specific package that you will be using in the codebase. . you need to learn the usefulness of each package. For the current project, you will need two packages namely @react-native-community/geolocationand react-native-maps. Here, you can find later that I will be using the Geolocation component from @react-native-community/geolocation. And will use the Marker and MapView from react-native-maps.
Also, consider that you should work on a newer version of React Native. The version should not be older than 0.64.3.
Get into the understanding of the code snippets in the App.js folder
Firstly, you have to use the import statement. This will allow you to get the components required for the app. Consider the following syntax.
1
2
3
4
5
import React, {useState} from 'react';
import {StyleSheet, View, Dimensions} from 'react-native';
import MapView from 'react-native-maps';
import {Marker} from 'react-native-maps';
import Geolocation from '@react-native-community/geolocation';
You have to be specific about both the components and the packages from which you are taking the components. Here, you need to use the import statement to take React and useState from ‘react’; StyleSheet, Dimensions, and View from ‘react-native’; MapView and Marker from react-native-maps and lastly Geolocation from @react-native-community/geolocation.
Now, you have to get backward compatibility and establish the compatibility between the project’s geolocation API and that of the web browser. For this, you have to add the following line
navigator.geolocation =
require('@react-native-community/geolocation');
1
2
3
4
5
const App = () => {
  const [coordinates, setCoordinates] = useState({
    latitude: 22.57371753630649,
    longitude: 88.4376725968472,
  });
Here, you have to consider the setCoordinate to bring any change tothe state of coordinate.
Specify the MainContainer where the app screen will render. For this use a return() function and <View> component with a styling element. Refer to the following syntax.
return (
<View style={styles.MainContainer}>
Following this, you have to present the MapView adding certain parameters and objects to it.
1
2
3
4
5
6
7
8
 <MapView
        style={{
          width: Dimensions.get('window').width,
          height: Dimensions.get('window').height,
        }}
        showsUserLocation={true}
        zoomEnabled={true}
        zoomControlEnabled={true}
Here, what I have done is used the Dimensions to get my app more responsive to different screens. The code specifies that width and height of the app will be responsive to whichever screen it renders to.
Further, showsUserLocation, zoomEnabled, and zoomControlEnabled are set as true.
1
2
3
4
5
6
 initialRegion={{
          latitude: coordinates.latitude,
          longitude: coordinates.longitude,
          latitudeDelta: 0.062,
          longitudeDelta: 0.0121,
        }}>
It is one of the props of the MapView component. It considers an object as a value. You can see four keys related to the object namely latitude, longitude, latitudeDelta, and longitudeDelta. The values are numbers that represent coordinates on the map.
You will use this code syntax to specify the initial region on the screen of the app. The longitude and latitude are the coordinates that will specify where the map center will be as soon as the app loads. The values of longitudeDelta and latitudeDelta will indicate how zoomed out or zoomed in the map will be when it starts.
<Marker coordinate={coordinates} />
Marker is a component and the syntax will render a red water drop marker on the app screen to denote the selected location. Latitude and longitude are considered props.
Now, you have to start with styling objects and components. First, you have to close all the tags and export the function App. consider the below-given syntax.
1
2
3
4
5
6
7
8
9
10
11
12
13
14
15
16
17
18
19
20
21
22
23
</MapView>
    </View>
  );
};
export default App;
const styles = StyleSheet.create({
  MainContainer: {
    position: 'absolute',
    top: 0,
    left: 0,
    right: 0,
    bottom: 0,
    alignItems: 'center',
    justifyContent: 'flex-end',
  },
  mapStyle: {
    position: 'absolute',
    top: 0,
    left: 0,
    right: 0,
    bottom: 0,
  },
});
Here, I have styled the mapStyle and the MainContainer. The value of the position always has to be absolute. You can add other styling parameters but the stated parameters are standard. The value of the alignItems should be center.
Now, you have to run the app. Let’s get into the required steps.
Getting started with the app running process
You have to open a new project terminal in the VS code editor and run the command npm install. This way, you will be able to install the necessary dependencies. Then, you have to run npx react-native run-android. Wait till it bundles and the emulator will eventually start.
You will see the app as shown in image 1.
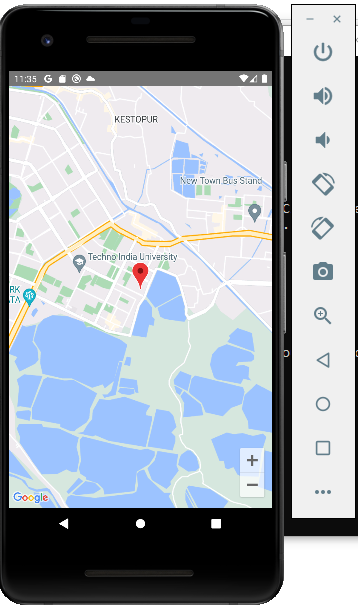
Image 1
You can use zoom in and zoom out using the touch sensor or you can use the +, - button at the bottom of the app screen to zoom in or zoom out the chosen location. This way you can navigate the app.
We are at the end of our project. However, I want to mention the most important part of this project is to learn the process of building a basic React Native app, navigating the VS code editor, and getting acquainted with the particular use of React Native third-party libraries.

A science graduate who has a keen interest to lean about new technologies and research area. With an experience in the field of data analytics and content writing, she aims to share her knowledge among passionate tech readers.


