
Creating a skeleton Screen for React Native app
While developing an app, you should never overlook the segment of User Experience. Skeleton screens being a significant part of UX should be taken into consideration. Skeleton screens can make your app much more interactive. Embedding such a screen in your app can also increase user engagement. If are you curious about learning the process of creating a skeleton Screen, then stay with me till the end of the blog.
Here, we will explain each and every step so that you don’t face any difficulty in creating your Skeleton Screen. However, first, let’s understand more about this screen.
Explain Skeleton Screen
Skeleton Screen is simply a wireframe of either an app or a webpage that comes up on the screen while it takes time to load the app content. With this layout, app users can understand what type of content (text or images) the app page holds. You can also call it a placeholder.
Explain the use of a Skeleton Screen in apps
The foremost use of Skeleton Screen in an app is to increase user interactivity. Also, it can allow you to improve the UX of the app. Besides, it is also used in web pages, where its utility is the same as that of apps.
You should never miss embedding a properly designed Skeleton Screen especially if your app or webpage is stuffed with heavy content. In this case, there is a possibility that it will take time to load completely. If you don't want your app to be boring, integrate a well-designed Skeleton screen.
Using a skeleton screen is a way of providing feedback to users while they interact with your app, in a sense, that it indicates that some content is loading and about to open up on the app screen. So, don’t confuse your users with a black loading screen. Get instead an interestingly designed Skeleton Screen.
Categories of skeleton Screens
There are two categories of Skeleton screens namely content-based wireframes and color-based wireframes. The only difference between these categories is that content-based wireframes use grey colors while color-based wireframes have different colors based on the color of the content.
Prominent examples of color-based wireframes include Pinterest whereas examples of content-based wireframes include Facebook, Google Drive, LinkedIn, and many more.
This is applicable to both web pages and apps of these mentioned websites.
What can be used in place of the Skeleton Screen?
There are numerous options that you can consider in place of Skeleton Screens but they may not be as interactive as a Skeleton Screen. The options include an animated loading screen, a loading spinner, and progressive bars.
These three choices don't meet the purpose of skeleton Screens. So, it's better not to consider them and move forward with building a Skeleton screen.
What is the Prior-needed context?
There are two tasks that you need to accomplish before moving further. These are as follows.
- Set up your development system in react native app development services- here, you have to get all the required software installed in your system. Some of them include Node.js. Android Studio and others. Get the complete details from the linked tutorial blog.
- Learn the basics of making a React Native app- this is the most important prerequisite because without an app you cannot add the Skeleton Screen. It must need an app with some content. Also, it will give you a clear idea of the process of adding components and generating a codebase. Check the attached link, if you want guidance.
Designing the codebase
Here, you have to work on three different js files. Let us see what those are.
CardSkeleton.js file
Create a folder named ‘Skeleton’ and add two files MainSkeleton.js and CardSkeleton.js in the folder.
Here, in this section, you will learn about the steps of creating the CardSkeleton component in the CardSkeleton.js file.
Below are the fragmented parts of the code snippets. Follow along as I explain.

Image 1
Import the React Native components as specified in image 1. Here, you can see a component of LinearGradient taken from the third-party React Native library react-native-linear-gradient. You have to install this library and store it in your project. For doing this, pass
npm install react-native-linear-gradient --save
In your app terminal.

Image 2
The syntax builds an AnimatedComponent and it is from the component LinearGradient. The variable AnimatedLG holds the built animated component. It further animates the LinearGradient.

Image 3
Here, the code introduces a CardSkeleton component with props namely width and height. It is the part of presenting the loading animation on your app screen.
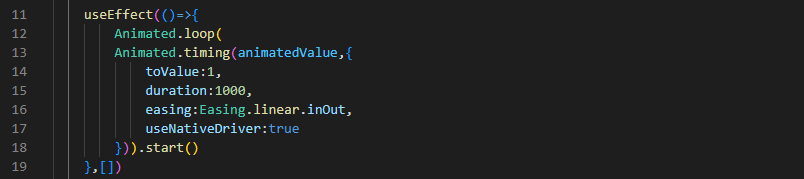
Image 4
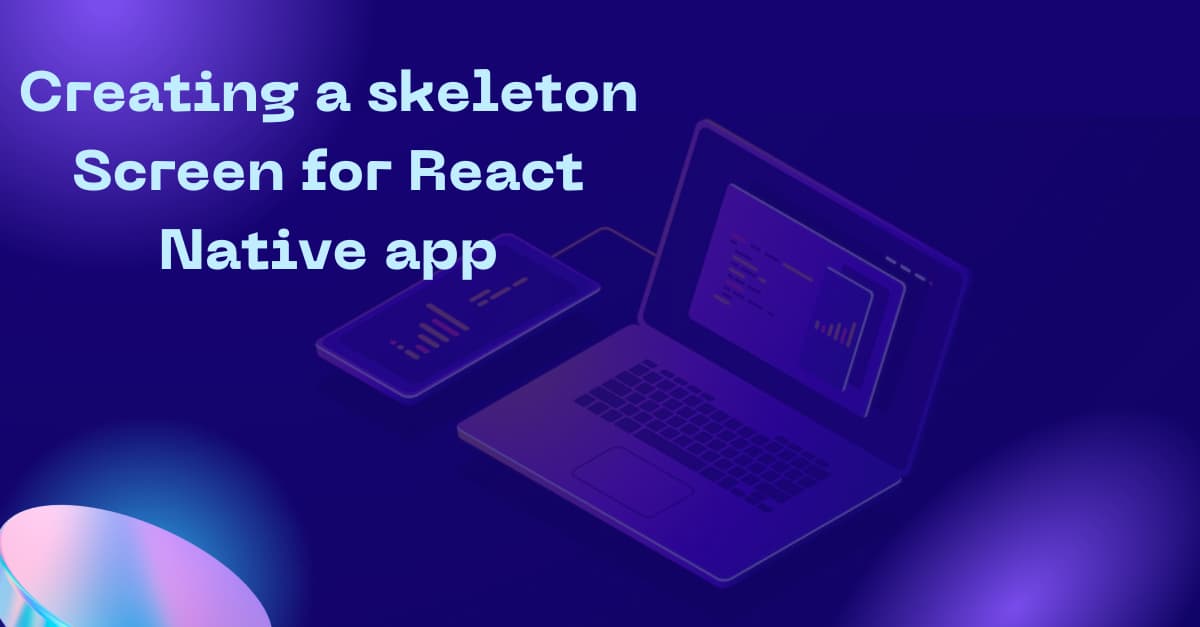
The useEffect hook is used to get the animation loop. Also, you have to use the Animated component from React Native to design the animation.
The variable animatedValue is animated from 0 to 1. This animation will continue for 1000 milliseconds. Also, it uses a Easing.linear effect. You have to set the useNativeDriver as true to ensure that the animation is controlled by the native thread rather than the JavaScript thread.

Image 5
The code specifies a new variable translateX. The inputRange of this variable is [0,1] and the outputRange is [-width, width]. It will help in animating the chosen object. Here, the translateX is used to fix the x-axis value of the considered object.
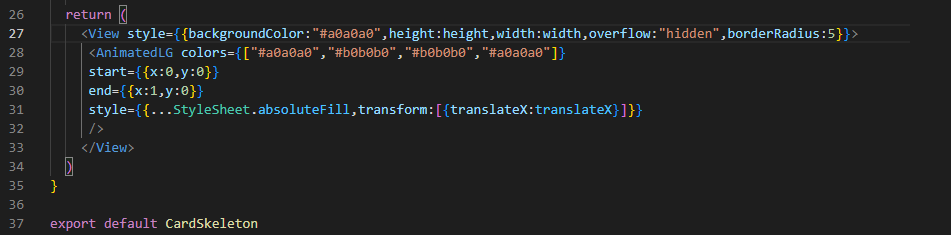
Image 6
It creates a View component with some styling objects backgroundColor, height, width, overflow, borderRadius. You can also see the AnimatedLG variable with four colors. It has an endpoint of {x:1,y:0} and a start point of {x:0,y:0}.
After completing the component, you need to export the CardSkeleton component and use it in the next MainSkeleton.js file.
Let's see how you can frame the MainSkeleton.js file.
MainSkeleton.js file

Image 7
Get all the components in this file as mentioned in image 7.
You can find the component CardSkeleton imported from ./CardSkeleton.

Image 8
MainSkeleton is the function introduced in this code syntax. Further, hold the ScrollView component inside the return() function. The ScrollView has a flex of 1, padding of 10 pixels, and a specific background color. Also, hold a View component inside ScrollView. The View component has a vertical margin of 10 pixels and a left margin of 10 pixels. The Cardskeleton that is included in this View component has a height of 410 pixels, a width of 370 pixels, and borderRadius of 5 pixels.
Image 9
In an exact manner, you have to add four different View components and CardSkeleton components as shown in image 9.

Image 10
The syntax shown in image 10 sets up the view container with a row as its flexDirection and 20 pixels as its vertical margin.
To hold a CardSkeleton component, a View component, with 20 pixels as its margin at the left.
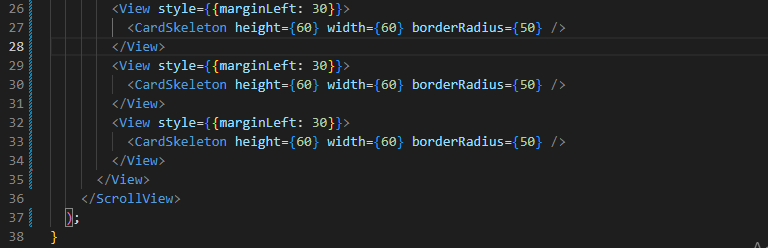
Image 11
Similarly, create other View and CardSkeleton components with some styling parameters. Also, close the main View and ScrollView tags.
Lastly, with the line export default MainSkeleton, export the created MainSkeleton component.
App.js file
This is the last file that you have to create. So, let's get started.

Image 12
Get the React Native components from the mentioned libraries. Also, you have to import the MainSkeleton component from ./Skeleton/MainSkeleton, as stated in image 12.

Image 13
Introduce a component named App. To get the main container in which the skeleton screen will be seen, use a View component with styles.container.
Also, use the MainSkeleton component that you have imported in the starting lines. Close the tag of </View>. Refer to Image 13.

Image 14
Lastly, you have to consider the export statement and go forward using StyleSheet, if you want.
And it is done. Now let's understand how you can run the app.
For this, you have to create a project terminal. Yes, it should be created from your app.
Then, run two commands: npm install and npx react-native-run-android.
This will get the emulator started on your dev screen. It will look as presented in image 15.
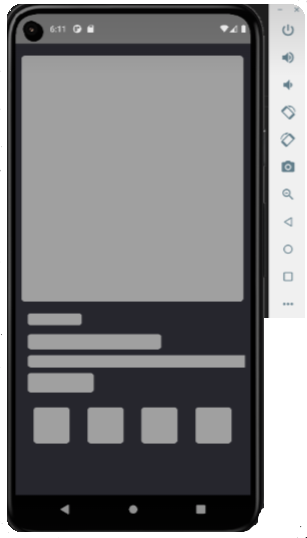
Image 15
And you have successfully created the skeleton screen in your already-built React Native app.
Hope you have enjoyed the entire process. If you are a developer, don't forget to share the project with your friends.

A science graduate who has a keen interest to lean about new technologies and research area. With an experience in the field of data analytics and content writing, she aims to share her knowledge among passionate tech readers.


